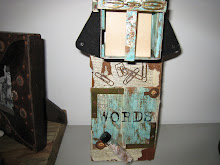
My inspirational buddy Val-Vals Altered Heart Journey in my links-suggested that I tell about how I did the last textured piece I posted. So here goes...
I used Artist board for the base again. I really like it when I am going to be adding a lot of stuff. No worries about buckling or warping. And it isn't too expensive. I get mine from Dick Blick.
Instead of tissue paper, this time I gooped on gesso and layed cheese cloth on. Then I added more gesso, just glopped it on and threw in some modeling paste just 'cause.
I put the branch on first. Glued it in place and after it dried, I added the nest and other stuff.
The nest was a many step process. First I gel-mediumed it. Then after that dried I gessoed it. Then after that dried I cut it in half. I glued it in place with E6000, the same glue I used for the branch and window and bricks and bark.
Then I used gel-medium to attach the leaves.
After that all dried, I used modeling paste to build up around the bricks and window and branch and nest etc. I just use my fingers to put it on. Easier to smooth that way.
Then I put modeling paste on top of all the leaves. I let them set for a few minutes and took a toothpick and drew in the veins.
After that all dried I gessoed everything. After that dried I looked around at different angles and added more modeling paste where I needed to.
From there it is just painting. I do the whole thing in one color. Then I use a shade lighter for accent. Then I use metallic craft paints for hi-lights. This was a tough one to paint. Lots of nooks and crannies. I even had to use a toothpick to get into the nest spaces.
Oh I almost forgot, I mounted the eye in paper clay. And the arm coming out of the nest is from a doll I took apart. It is holding a little egg.
So that's how it's done. Very time consuming with all the dry time. But fun I think.
Peace
About Me
- mary schweitzer
- 57 year old work in progress. Mixed media is my current favorite form of art. Married with 2 grown kids. I collect things, broken things, whole things, shiny things, rusty things, things that other people would toss away. I want to know how to do everything!
Demon Angel Shrine


Fairy Shrine


Sewing Shrine

Sewing Shrine Details


Button fairies

Dot painting

Reality Is Merely An Illusion

Brothers

Remember Me


noteworthy

6 comments:
Thanks so much for posting your explanation as to how you did this. Wow, now I'm even more impressed because you spent a lot of time on this, and I'm sure the painting was quite time-consuming. I hate painting into the nooks and crannie, but I think the end result makes it well worth it.
Funny you should use the modeling paste on top of your leaves and then draw in the veins with a toothpick. I say that because I did the exact same thing on my latest piece (which is posted on my blog), except I used caulk instead of modeling paste. And I hadn't seen your piece at that time and didn't know you did yours that way. Cool, eh?, we both used the same approach independently.
I totally love this piece, Mary. It's so beautiful. I love the nest, and the arm coming out of it holding an egg. How very creative! You seem to have this Mega-Texture technic down very well by now. I'm so proud of you.
Will you be putting this piece on ETSY?
Mary another beautiful piece. Love the explanation / tutorial. I am a huge fan of both you and Val so it is so fun to see / read all of the details. I also love the new 'sewing' shrine you are working on. Can't wait to see the finished project!
I am going to try a project like this when I am on my summer hols, I love this piece and THANK you for your explanation on how you did it...
Thanks for sharing how you did this, sound like a blast! I love the jawbone too, it is awsome. Did you figure out what it is yet? I thought it had rather odd looking teeth.
Mary thanks for the insight for this technique...I will definitely be trying it.
Also I love all your assemblages, very creative!
Hi Mary, I loved your jawbone, that was great, and your other new pieces, thanks for the tutorial also. Good stuff!
Post a Comment